apt install php7.4-common php7.4-mysql php7.4-xml php7.4-xmlrpc php7.4-curl php7.4-gd php7.4-imagick php7.4-cli php7.4-dev php7.4-imap php7.4-mbstring php7.4-opcache php7.4-soap php7.4-zip php7.4-intl -y
Kamis, 03 Februari 2022


Install PhpMyadmin Ubuntu 20.04 Apache2
Install PhpMyAdmin latest version, untuk mencari versi terakhir/latest dari PhpMyAdmin dapat dilihat diwebsite resmi dari phpmyadmin https://phpmyadmin.net/files
cd /home
wget https://files.phpmyadmin.net/phpMyAdmin/5.1.1/phpMyAdmin-5.1.1-all-languages.zip
apt install unzip -y
unzip phpMyAdmin-5.1.1-all-languages.zip
lalu pindahkan folder phpmyadmin yang sudah di unzip ke dalam folder /share
mv phpMyAdmin-*/ /usr/share/phpmyadmin
tahap selajutnya buat sebuah di directory untuk phpmyadmin temp file, lalu atur permission.
mkdir -p /var/lib/phpmyadmin/tmp
chown -R www-data:www-data /var/lib/phpmyadmin
Buat directory dari phpmyadmin, ini berfungsi jika ingin menggunakan password authentikasi
mkdir /etc/phpmyadmin
Langkah 4 : Edit File Konfigurasi PhpMyAdmin
Ganti nama file config dari phpmyadmin.
cp /usr/share/phpmyadmin/config.sample.inc.php /usr/share/phpmyadmin/config.inc.php
Edit file config.inc.php dan masukan blowfich_secret
nano /usr/share/phpmyadmin/config.inc.php
Cari $cfg[‘blowfish_secret’] lalu isi generate secret seperti command dibawah:
$cfg['blowfish_secret'] = 'VlhyKab[niEixkYCfMepu:wC4c=0fzb,';
Buat Temp directory pada konfigurasi phpmyadmin:
$cfg['TempDir'] = '/var/lib/phpmyadmin/tmp';
Langkah 5 : Konfigurasi Apache WebServer (Install PhpMyadmin Ubuntu 20.04)
dan Menambahkan Apache file konfigurasi di dalam file:
nano /etc/apache2/conf-enabled/phpmyadmin.conf
copy/paste command berikut ini :
Alias /phpmyadmin /usr/share/phpmyadmin

<Directory /usr/share/phpmyadmin>
    Options SymLinksIfOwnerMatch
    DirectoryIndex index.php

    <IfModule mod_php5.c>
        <IfModule mod_mime.c>
            AddType application/x-httpd-php .php
        </IfModule>
        <FilesMatch ".+\.php$">
            SetHandler application/x-httpd-php
        </FilesMatch>

        php_value include_path .
        php_admin_value upload_tmp_dir /var/lib/phpmyadmin/tmp
        php_admin_value open_basedir /usr/share/phpmyadmin/:/etc/phpmyadmin/:/var/lib/phpmyadmin/:/usr/share/php/php-gettext/:/usr/share/php/php-php-gettext/:/usr/share/javascript/:/usr/share/php/tcpdf/:/usr/share/doc/phpmyadmin/:/usr/share/php/phpseclib/
        php_admin_value mbstring.func_overload 0
    </IfModule>
    <IfModule mod_php.c>
        <IfModule mod_mime.c>
            AddType application/x-httpd-php .php
        </IfModule>
        <FilesMatch ".+\.php$">
            SetHandler application/x-httpd-php
        </FilesMatch>

        php_value include_path .
        php_admin_value upload_tmp_dir /var/lib/phpmyadmin/tmp
        php_admin_value open_basedir /usr/share/phpmyadmin/:/etc/phpmyadmin/:/var/lib/phpmyadmin/:/usr/share/php/php-gettext/:/usr/share/php/php-php-gettext/:/usr/share/javascript/:/usr/share/php/tcpdf/:/usr/share/doc/phpmyadmin/:/usr/share/php/phpseclib/
        php_admin_value mbstring.func_overload 0
    </IfModule>

</Directory>

# Authorize for setup
<Directory /usr/share/phpmyadmin/setup>
    <IfModule mod_authz_core.c>
        <IfModule mod_authn_file.c>
            AuthType Basic
            AuthName "phpMyAdmin Setup"
            AuthUserFile /etc/phpmyadmin/htpasswd.setup
        </IfModule>
        Require valid-user
    </IfModule>
</Directory>

# Disallow web access to directories that don't need it
<Directory /usr/share/phpmyadmin/templates>
    Require all denied
</Directory>
<Directory /usr/share/phpmyadmin/libraries>
    Require all denied
</Directory>
<Directory /usr/share/phpmyadmin/setup/lib>
    Require all denied
</Directory>
setelah itu restart apache webserver
systemctl restart apache2
Langkah 6 : Install Mysql Database Server (Install PhpMyadmin Ubuntu 20.04)
Install Mysql-Server sebagai database:
apt install mysql-server -y
Memberikan password untuk database
sudo mysql_secure_installation
Masuk ke database melaui command berikut ini.
mysql -u root
Buat user dan password database dengan privileges nya sama dengan root.
CREATE USER 'usertest'@'localhost' IDENTIFIED BY 'Your-Password';
GRANT ALL PRIVILEGES ON *.* TO 'usertest'@'localhost';
FLUSH PRIVILEGES;
exit
Langkah 7 : Akses PhpMyAdmin Di Browser
Jika sudah berjalan baik, ketikkan di browser anda alamat ip server. http://[your-ip-address] or http://[yourdomain/phpmyamdin]
Akses URL http://[Your-Ipaddress]/phpmyadmin

Sekiat Dokumentasi Install PhpMyAdmin, Semoga bermanfaat dan bisa menajdi pembelajran bagi kita semua.
Cara mengganti versi php pada commandline ubuntu
a2enmod php5.6 #to enable php5
a2enmod php7.1 #to enable php7
Ketika saya menonaktifkan php7.1 di modul Apache dan mengaktifkan php 5.6, Apache mengenali perubahan tersebut dan menggunakan interpreter php 5.6 seperti yang diharapkan.
Tetapi ketika saya menjalankan server web php internal dari baris perintah:
php -S localhost:8888
php menangani permintaan menggunakan php 7. Jadi bagaimana cara beralih antara php 5.6 dan php 7.1 di baris perintah?
Selasa, 18 Januari 2022
Cara Mereset Auto Increment Pada Database MySQL
Bisa dilihat di dalam id, nomor yang pada awalnya berurutan menjadi tidak berurutan. Ya mungkin ini tak masalah karena masing-masing telah mempunyai id yang berbeda. Tapi bagaimana jika ingin mengurutnya kembali memulai dari 0 - 6 (Sesuai data di atas)?
Ada beberapa cara diantaranya :
1. Menghapus field id dengan menggunakan perintah berikut :
ALTER TABLE nama_tabel DROP nama_field
2. Data id akan terhapus dan menyisakan field nama saja.
3. Buat perintah seperti ini dan jalankan.
ALTER TABLE nama_tabel ADD nama_field INT NOT NULL AUTO_INCREMENT PRIMARY KEY FIRST
4. Sekarang data sudah berurut dari 1-6.
Selasa, 05 Oktober 2021
How To Install PHP 7.4 on Ubuntu 20.04/18.04/16.04
How to Install PHP 7.4 on Ubuntu?. Welcome to today’s guide on how to install PHP 7.4 on Ubuntu 20.04/18.04/19.04/16.04 Linux. The PHP release 7.4.0 has been made available for the general public and for use in Production environments.
PHP is a popular server scripting language known for creating dynamic and interactive Web pages. PHP is widely-used programming language in the Web. Use the steps below to install PHP 7.4 on Ubuntu 20.04/19.04/18.04/16.04.
Install PHP 7.4 on Ubuntu 20.04
NOTE: Ubuntu 20.04 ships with PHP 7.4 in its upstream repositories. Just install it and the extensions you with the apt package manager.
sudo apt update
sudo apt install php php-cli php-fpm php-json php-common php-mysql php-zip php-gd php-mbstring php-curl php-xml php-pear php-bcmath
Confirm PHP version:
$ php --version
PHP 7.4.3 (cli) (built: Mar 26 2020 20:24:23) ( NTS )
Copyright (c) The PHP Group
Zend Engine v3.4.0, Copyright (c) Zend Technologies
    with Zend OPcache v7.4.3, Copyright (c), by Zend Technologies
Listing all loaded PHP modules:
$ php -mInstall PHP 7.4 on Ubuntu 18.04/16.04
For the other editions of Ubuntu, use the process below:
Step 1: Add PHP PPA Repository
We’ll add ppa:ondrej/php PPA repository which has the latest build packages of PHP.
sudo apt-get update
sudo apt -y install software-properties-common
sudo add-apt-repository ppa:ondrej/php
sudo apt-get update
Step 2: Install PHP 7.4 on Ubuntu 18.04/19.04/16.04
Install PHP 7.4 on Ubuntu 18.04/19.04/16.04 using the command:
sudo apt -y install php7.4Check version installed:
$ php -v
PHP 7.4.0beta4 (cli) (built: Aug 28 2019 11:41:49) ( NTS )
Copyright (c) The PHP Group
Zend Engine v3.4.0-dev, Copyright (c) Zend Technologies
    with Zend OPcache v7.4.0beta4, Copyright (c), by Zend Technologies
Use the next command to install additional packages:
sudo apt-get install php7.4-xxxExample:
sudo apt-get install -y php7.4-{bcmath,bz2,intl,gd,mbstring,mysql,zip,common}PHP configurations related to Apache is stored in /etc/php/7.4/apache2/php.ini
Using PHP 7.4 with Nginx on Ubuntu:
The installation of php on Ubuntu configures Apache. For users interested in running Nginx and PHP, you need to stop and disable Apache service.
sudo systemctl disable --now apache2Then install fpm extension and nginx packages.
sudo apt-get install nginx php7.4-fpmNginx and fpm services should be running.
$ systemctl status php7.4-fpm nginx
● php7.4-fpm.service - The PHP 7.4 FastCGI Process Manager
   Loaded: loaded (/lib/systemd/system/php7.4-fpm.service; enabled; vendor preset: enabled)
   Active: active (running) since Mon 2019-09-16 17:09:41 UTC; 27s ago
     Docs: man:php-fpm7.4(8)
 Main PID: 25321 (php-fpm7.4)
   Status: "Processes active: 0, idle: 2, Requests: 0, slow: 0, Traffic: 0req/sec"
    Tasks: 3 (limit: 2362)
   CGroup: /system.slice/php7.4-fpm.service
           ├─25321 php-fpm: master process (/etc/php/7.4/fpm/php-fpm.conf)
           ├─25339 php-fpm: pool www
           └─25340 php-fpm: pool www

Sep 16 17:09:41 ubuntu18 systemd[1]: Starting The PHP 7.4 FastCGI Process Manager...
Sep 16 17:09:41 ubuntu18 systemd[1]: Started The PHP 7.4 FastCGI Process Manager.

● nginx.service - A high performance web server and a reverse proxy server
    Loaded: loaded (/lib/systemd/system/nginx.service; enabled; vendor preset: enabled)
    Active: active (running) since Mon 2019-09-16 17:09:42 UTC; 6min ago
      Docs: man:nginx(8)
  Main PID: 25441 (nginx)
     Tasks: 2 (limit: 2362)
    CGroup: /system.slice/nginx.service
            ├─25441 nginx: master process /usr/sbin/nginx -g daemon on; master_process on;
            └─25442 nginx: worker process
 Sep 16 17:09:42 ubuntu18 systemd[1]: Starting A high performance web server and a reverse proxy server…
 Sep 16 17:09:42 ubuntu18 systemd[1]: nginx.service: Failed to parse PID from file /run/nginx.pid: Invalid argument
 Sep 16 17:09:42 ubuntu18 systemd[1]: Started A high performance web server and a reverse proxy server.
PHP FPM configuration file is /etc/php/7.4/fpm/pool.d/www.conf.
Kamis, 15 April 2021
Welcome to MultiChain Web Demo
This software uses PHP to provide a web front-end for a MultiChain blockchain node.
It currently supports the following features:
- Viewing the node's overall status.
- Creating addresses and giving them real names (names are visible to all nodes).
- Changing global permissions for addresses.
- Issuing assets, including custom fields and uploading a file.
- Updating assets, including issuing more units and updating custom fields and file.
- Viewing issued assets, including the full history of fields and files.
- Sending assets from one address to another.
- Creating, decoding and accepting offers for exchanges of assets.
- Creating streams.
- Publishing items to streams, as JSON or text or an uploaded file.
- Viewing stream items, including listing by key or publisher and downloading files.
- Writing, testing and approving Smart Filters (both transaction and stream filters).
The web demo does not yet support the following important functionality in the MultiChain API:
- Managing per-asset and per-stream permissions.
- Multisignature addresses and transactions.
- Adding metadata (or stream items) to permissions or asset transactions.
- Viewing an addresses' transactions.
- Subscribing to assets and viewing their transactions.
- Viewing a list of keys or publishers in a stream.
- Peer-to-peer node management.
- Message signing and verification.
- Blockchain upgrading.
- Working with the binary cache.
The MultiChain Web Demo is still under development, so please contact us if any of these things are crucial for your needs.
System Requirements
- A computer running web server software such as Apache.
- PHP 5.x or later with the
curlandJSONextensions. - MultiChain 1.0 alpha 26 or later, including MultiChain 2.0 alphas and betas.
Create and launch a MultiChain Blockchain
If you do not yet have a chain to work with, Download MultiChain to install MultiChain and create a chain named chain1 as follows:
multichain-util create chain1
multichaind chain1 -daemon
If your web server is running on the same computer as multichaind, you can skip the rest of this section. Otherwise:
multichain-cli chain1 stop
Then add this to ~/.multichain/chain1/multichain.conf:
rpcallowip=[IP address of your web server]
Then start MultiChain again:
multichaind chain1 -daemon
Configure the Web Demo
This section assumes your blockchain is named chain1 and you are running the node and web server on a Unix variant such as Linux. If not, please substitute accordingly.
Make your life easy for the next step by running these on the node's server:
cat ~/.multichain/chain1/multichain.conf
grep rpc-port ~/.multichain/chain1/params.dat
In the web demo directory, copy the config-example.txt file to config.txt:
cp config-example.txt config.txt
In the demo website directory, enter chain details in config.txt e.g.:
default.name=Default                # name to display in the web interface
default.rpchost=127.0.0.1           # IP address of MultiChain node
default.rpcport=12345               # usually default-rpc-port from params.dat
default.rpcuser=multichainrpc       # username for RPC from multichain.conf
default.rpcpassword=mnBh8aHp4mun... # password for RPC from multichain.conf
Multiple chains are supported by the web demo by copying the same section again but with different prefixes before the period, for example:
another.name=...
another.rpchost=...
...
Note that the config.txt file is readable by users of your web demo installation, and contains your MultiChain API password, so you should never use this basic setup for a production system.
How to enable and disable PHP curl module with Apache on Ubuntu Linux and Debian/Ubuntu Linux Specific Commands to Start/Stop/Restart Apache
Instructions
Installation of Curl module
Let's install Apache curl module along with Apache 2 webserver and PHP.# apt install libapache2-mod-php php-curl
Restart the Apache webserver:# service apache2 restart
Check for curl module state
Insert the following lines into a new PHP script eg. curl-check.php within /var/www/html/ directory:<?php
echo 'Curl: ', function_exists('curl_version') ? 'Enabled' . "\xA" : 'Disabled' . "\xA";
?>
Make the script executable and use curl command to render the output of curl-check.php php code:# chmod +x /var/www/html/curl-check.php
# curl localhost/curl-check.php
Curl: Enabled
Insert the following lines into a new PHP script eg.
curl-check.php within /var/www/html/ directory:<?php
echo 'Curl: ', function_exists('curl_version') ? 'Enabled' . "\xA" : 'Disabled' . "\xA";
?>curl command to render the output of curl-check.php php code:# chmod +x /var/www/html/curl-check.php # curl localhost/curl-check.php Curl: Enabled
Disable PHP curl module
To disable curl php module execute:# phpdismod curl
# service apache2 restart
# curl localhost/curl-check.php
Curl: Disabled
To disable curl php module execute:
# phpdismod curl # service apache2 restart # curl localhost/curl-check.php Curl: Disabled
Enable PHP curl module
To enable curl php module execute:# phpenmod curl
# service apache2 restart
# curl localhost/curl-check.php
Curl: Enabled
To enable curl php module execute:
# phpenmod curl # service apache2 restart # curl localhost/curl-check.php Curl: Enabled
You can either use service or /etc/init.d/ command as follows on Debian Linux version 7.x or Ubuntu Linux version Ubuntu 14.10 or older:
Restart Apache 2 web server, enter:
# /etc/init.d/apache2 restart
OR$ sudo /etc/init.d/apache2 restart
OR$ sudo service apache2 restart
To stop Apache 2 web server, enter:
# /etc/init.d/apache2 stop
OR$ sudo /etc/init.d/apache2 stop
OR$ sudo service apache2 stop
To start Apache 2 web server, enter:
# /etc/init.d/apache2 start
OR$ sudo /etc/init.d/apache2 start
OR$ sudo service apache2 start
A note about Debian/Ubuntu Linux systemd users
Use the following systemctl command on Debian Linux version 8.x+ or Ubuntu Linux version Ubuntu 15.04+ or above:## Start command ##
systemctl start apache2.service
## Stop command ##
systemctl stop apache2.service
## Restart command ##
systemctl restart apache2.service
We can view status using the following command:$ sudo systemctl status apache2.service
● apache2.service - The Apache HTTP Server
     Loaded: loaded (/lib/systemd/system/apache2.service; enabled; vendor preset: enabled)
     Active: active (running) since Wed 2021-02-24 20:39:39 UTC; 5 days ago
       Docs: https://httpd.apache.org/docs/2.4/
    Process: 115 ExecStart=/usr/sbin/apachectl start (code=exited, status=0/SUCCESS)
    Process: 15247 ExecReload=/usr/sbin/apachectl graceful (code=exited, status=0/SUCCESS)
   Main PID: 128 (apache2)
      Tasks: 6 (limit: 4672)
     Memory: 16.4M
     CGroup: /system.slice/apache2.service
             ├─  128 /usr/sbin/apache2 -k start
             ├─15254 /usr/sbin/apache2 -k start
             ├─15255 /usr/sbin/apache2 -k start
             ├─15256 /usr/sbin/apache2 -k start
             ├─15257 /usr/sbin/apache2 -k start
             └─15258 /usr/sbin/apache2 -k start

Feb 27 00:00:23 ubuntu-db-mgmnt systemd[1]: Reloaded The Apache HTTP Server.
Feb 28 00:00:23 ubuntu-db-mgmnt systemd[1]: Reloading The Apache HTTP Server.
Cara Instal Windows Subsystem For Linux 2 di Windows 10
Windows 10 – Lengkap Dengan Gambar
Dan pada artikel kali ini, WinPoin akan menunjukan langkah Instalasi Windows Subsystem For Linux 2 di Windows 10. Sebenarnya langkahnya bisa dibilang mirip dengan instalasi WSL 1 hanya saja ada langkah tambahan yang perlu dilakukan. Langsung saja, berikut adalah langkah langkahnya.
Langkah 1. Pastikan kamu sudah menggunakan Windows 10 May 2020 Update.
Langkah 2. Silahkan kamu tambahkan ‘Windows Subsystem For Linux’ di Turn Windows Features.
dism.exe /online /enable-feature /featurename:Microsoft-Windows-Subsystem-Linux /all /norestart
Catatan : Jika hanya instalasi Windows Subsystem For Linux Generasi pertama, setelah langkah ini kamu hanya perlu restart dan download distro linux dari Microsoft Store.
Langkah 3. Untuk melanjutkan instalasi WSL 2, selanjutnya kamu harus mengaktifkan ‘Virtual Machine Platform’ masih dari Turn Windows Features.
Atau langkah cepatnya kamu bisa mengetikan perintah berikut dalam Windows Powershell Run As Administrator.
dism.exe /online /enable-feature /featurename:VirtualMachinePlatform /all /norestart
Untuk menyelesaikan perubahan, silahkan Restart perangkat yang kamu gunakan.
Langkah 4. Untuk menjadikan WSL 2 sebagai Versi WSL Default, kamu bisa mengetikan perintah berikut masih dalam Windows Powershell Run As Administrator.
wsl --set-default-version 2
Jika kamu mendapati pesan “WSL 2 requires an update to its kernel component. For information please visit https://aka.ms/wsl2kernel” seperti pada gambar diatas, kamu harus mendownload dan menginstal file WSL Update yang dapat kamu download pada halaman Microsoft berikut.
Selanjutnya silahkan install file tersebut seperti biasa.
Panduan Instalasi Windows Server - Enable the Windows Subsystem for Linux
Windows Server Installation Guide
Enable the Windows Subsystem for Linux
Before you can run Linux distros on Windows, you must enable the "Windows Subsystem for Linux" optional feature and reboot.
Open PowerShell as Administrator and run:
PowerShell
Enable-WindowsOptionalFeature -Online -FeatureName Microsoft-Windows-Subsystem-Linux
Download a Linux distribution
Follow these instructions to download your favorite Linux distribution.
Extract and install a Linux distribution
Now that you've downloaded a Linux distribution, in order to extract its contents and manually install, follow these steps:
Extract the
<distro>.appxpackage's contents, using PowerShell:PowerShellRename-Item .\Ubuntu.appx .\Ubuntu.zip Expand-Archive .\Ubuntu.zip .\UbuntuRun the distribution launcher application in the target folder. The launcher is typically named
<distro>.exe(for example,ubuntu.exe).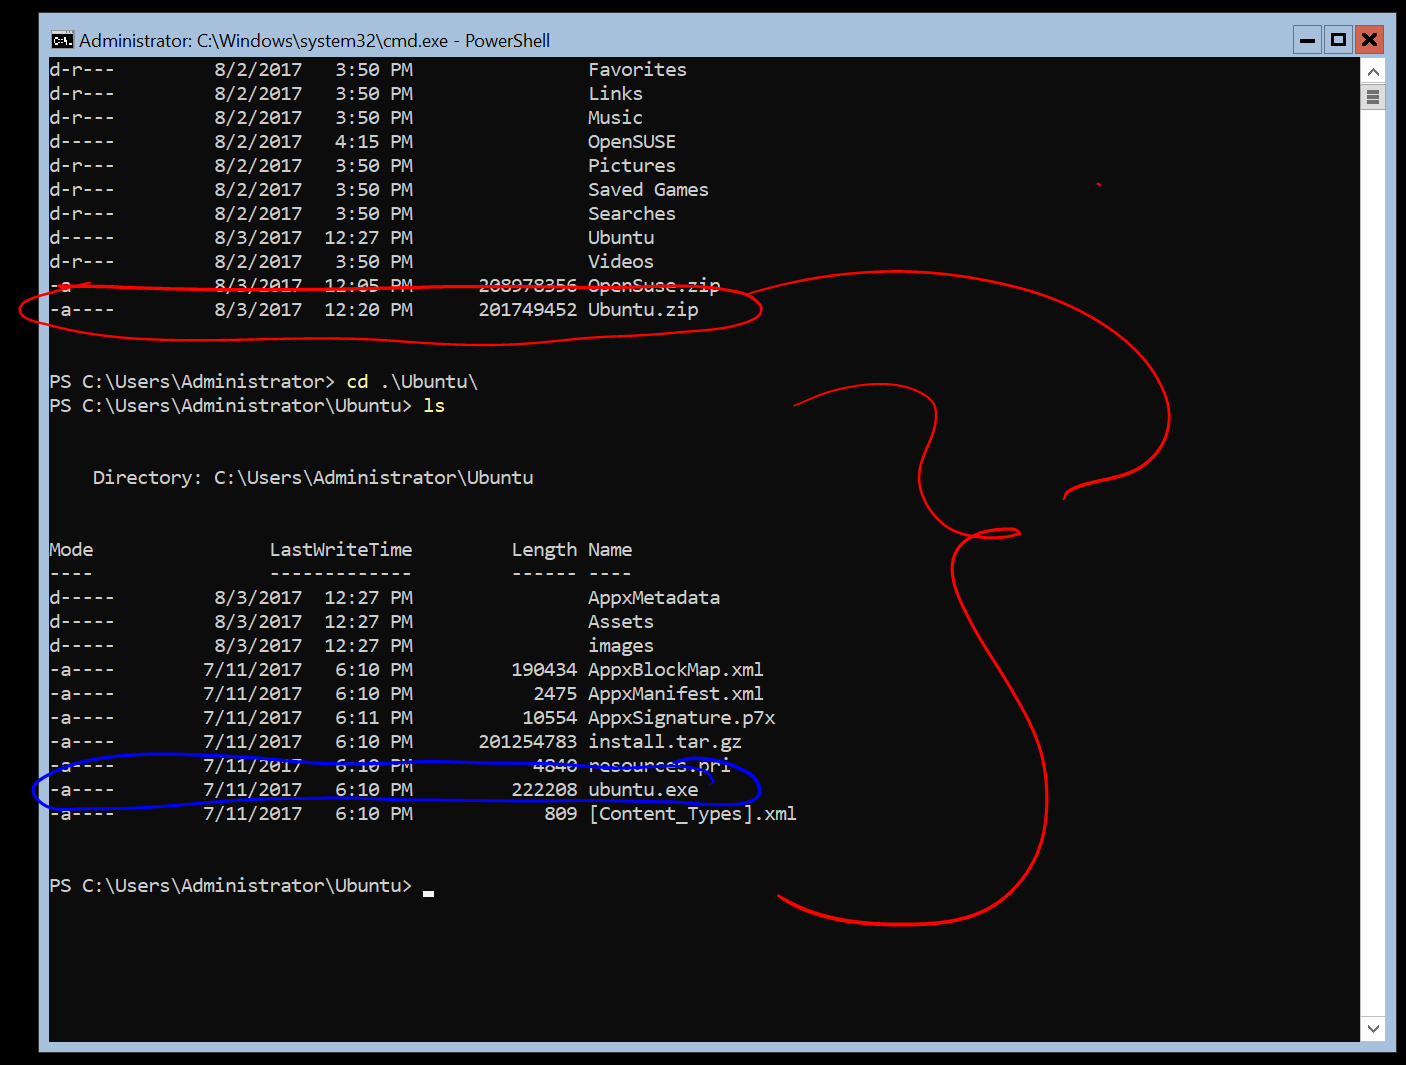
Caution
Installation failed with error 0x8007007e: If you receive this error, then your system doesn't support WSL. Ensure that you're running Windows build 16215 or later. Check your build. Also check to confirm that WSL is enabled and your computer was restarted after the feature was enabled.
3.Add your distro path to the Windows environment PATH (C:\Users\Administrator\Ubuntu in this example), using PowerShell:
PowerShell
$userenv = [System.Environment]::GetEnvironmentVariable("Path", "User")
[System.Environment]::SetEnvironmentVariable("PATH", $userenv + ";C:\Users\Administrator\Ubuntu", "User")
You can now launch your distribution from any path by typing <distro>.exe. For example: ubuntu.exe.
Now that it is installed, you must initialize your new distribution instance before using it.
source : https://docs.microsoft.com/en-us/windows/wsl/install-on-server
Langganan:
Postingan (Atom)